« Knife set - first test production run of handles (part 3) | Front Page | Knife set - more testing of box designs »
Knife set - hangi-toh handles ...
Posted by Dave Bull on February 26, 2012 [Permalink]
Now that the process for manufacturing the chisel handles is (basically) organized, it's time to figure out how to make the round handles for the hangi-toh, the main carving knife.
There really isn't a whole lot of mystery about how these are going to be made. I need a lathe.
Sato-san and I have been watching the auctions, and he called on Wednesday with the news that he had found one on Yahoo Auctions, but that I should check on it quickly, because it was finishing very shortly. I checked the page, and it looked like just what we needed - a small desktop lathe, apparently in good condition, and reasonably priced.
Looking up the model online, I found that it had good specs ... plenty of torque at low revs, which I think (I have no lathe experience myself) is what we need for small-scale woodworking on hard woods. It didn't come with any attachments, but it was cheap - 10,000 yen - so I put in a bid. Nobody else was interested, a few minutes later it was 'mine', and it arrived early this afternoon:

'Mide in Taiwan' indeed ... a Cockney lathe!

There is just a raw spindle, as it came without even a simple spur center. I'll head over to the hardware store on my bike tomorrow to pick one up, along with some basic turning tools, but for tonight, there must be a way to get this thing working ...

Here's a piece of recycled crib (see yesterday's post!) after a few seconds on the belt sander:

... and then a few passes with a hand plane; this should set us up I think.
Yes, indeed! Whee!

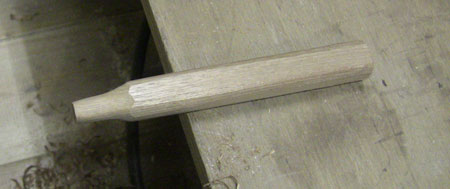
I don't have any proper lathe tools, so used a (very) old, retired chisel. It seemed to work well ... and no more than a few minutes later, we have our first miniature Louisville Slugger!

This one is actually a bit too 'plump'. I was just trying to eyeball the thickness, and erred a bit on the fat side. I'll look for some calipers at the hardware shop tomorrow ...

So the basic cutting of the knife handles seems not to be a problem. With a spur center on the lathe, some proper cutting tools, a pile of 'blanks' prepared, and some kind of template to refer to as I work, I think these won't take more than a few minutes each.
But this is the easy part. Making the brass sleeves is going to be a bit more complicated, as will be cutting the long groove down the body of each handle. Cross those bridges when we get to them!

[Update: later in the day] I had another go at this, using a piece sliced from the same cherry block I used for the other handles yesterday. I also tried fitting a small brass ferrule - one that I found in the back of the tool drawer ... no idea where it came from.

This particular ferrule doesn't have a smooth taper, but has a bump part way along where the metal has been stretched (this is presumably why it was tossed aside long ago). But it'll do for this test. I turned the handle to a close approximation of the size, then removed it from the lathe, slipped the ferrule over the end (testing the fit a number of times), and then put the whole thing back into the lathe and finished up with the ferrule in place, shaving the wood down to the same dimension. I want to get that joint between the brass and the wood as seamless as possible!

We can see in that closeup that the finishing certainly leaves something to be desired, but we're getting closer!
After I finished making that sample, I sent off an email to Sato-san letting him know about it, and he wrote back, "I can't wait to see it up close!"
Well, OK ...

Added by: Tom Kristensen on February 27, 2012, 6:46 am
For a guy with no lathe experience, an incomplete lathe, no turning tools and no calipers - you turn out a perfect piece of work!

Added by: Dave on February 27, 2012, 8:02 am
Well, it's pretty small-scale stuff ... not too much chance to get in trouble, I think!
(And when trying something new ... the internet is our friend!) :-)
Added by: Marc Kahn on February 27, 2012, 9:20 am
Dave,
Please explain the dynamics which make a hangi-toh handle so completely different from a chisel handle.
Thanks,
Marc
Added by: Dave on February 27, 2012, 9:43 am
Not quite sure what you mean ... simply they are held in a different way - vertically in the fist, rather than being pushed forward at a low angle. Completely different tool, really ...
(Today I've taken a break from getting these ready, to focus on the preparation for the Treasure Chest cases. If I don't get that project moving forward, I'll be in big trouble. I want to begin carving around the first of the month, so would love to get this woodwork stuff out of the way before then ... (not possible, really)
Add Your Input