« Hilo Bay [5] - more block planning | Front Page | Hilo Bay [7] - carving ... »
Hilo Bay [6] - colour separations
Posted by Dave Bull on March 27, 2006 [Permalink]
Continued from Hilo Bay [5] | Starting point of the thread is here
OK, getting closer to the moment when I can actually start cutting!
After spending most of yesterday evening looking over those sample layouts, I got it worked out to where I think I can get it all on six pieces of wood (using both sides of course).
Six of the faces will carry a single design sheet, although some of those will be used for printing more than one colour (areas that are far enough apart so the colour won't smear in the wrong place). The other six will each carry two sheets, some of them placed upside-down to each other, and some 'slipped' in a kind of staggered arrangement, again, making sure that there are no chances for smearing.
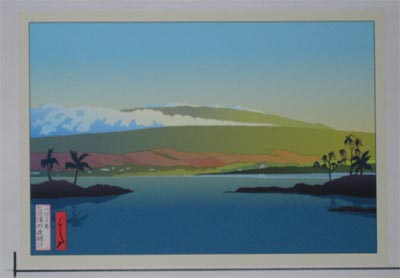
What happens next is a bit different from the classical technique. This print has no outlines, so it's not possible to use the 'cut the outlines first, then fill in the colours' method of working. There can be no single 'hanshita' (the term for the outline drawing on thin paper that is usually pasted onto the wood for carving the 'key block'). There will be no 'key block' for this print.
But I do have a full-scale completely worked-out image of the print - Gary's master copy, and that's what I will use to guide the carving on all the blocks. I took his image and tacked it onto a sheet of paper on which I had drawn lines showing where the registration marks would fall:
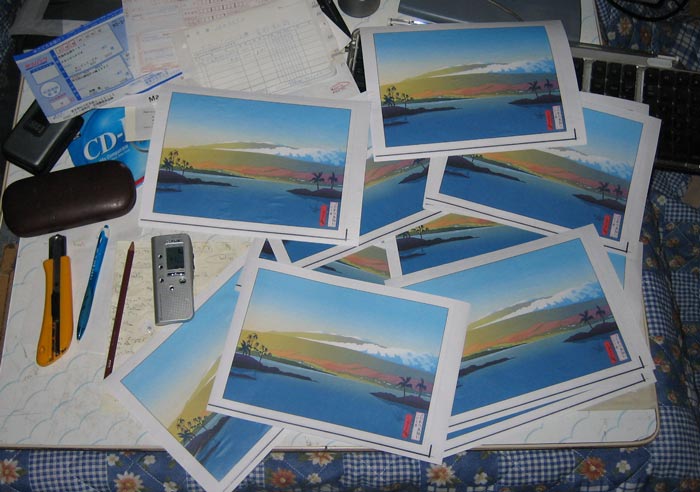
I then jumped on my bike and headed over to the next town, where there is a stationery store with a very high-quality colour copy machine. Unlike the places near my home offering colour copies, which all have machines that have been 'consumer fool-proofed', this shop has a 'raw' machine, and I can use the control panel to fool around and set it up exactly the way I want it.
This isn't just a matter of getting the contrast, etc. adjusted so that I get a print-out with good clear lines; I want to set the machine to give me a mirror-image copy.
This is not the way that hanshita tracings for carving are usually made. The normal procedure is to create a hanshita of identical orientation to the finished print. As it is pasted to the block face down, any prints pulled from such a carved block end up being in correct orientation.
But I have learned that when pasting a hanshita made on a modern colour copy machine, the oily film on the surface of such copies interferes with the bonding, and I inevitably have trouble with the thing peeling off part way through the job. I've tried cleaning the surface first with various solvents, but anything that cleans off the film also pulls off the colours ...
So, what I do is make the copy in mirror image, and paste it on the block face up. (Many years back I put up a web page showing this process.)
Anyway, the copy machine was in good condition today, so I put Gary's master image in place, and pulled 20 colour copies of it, using my 'special' 2-layer hanshita paper (also described on that page I just mentioned).
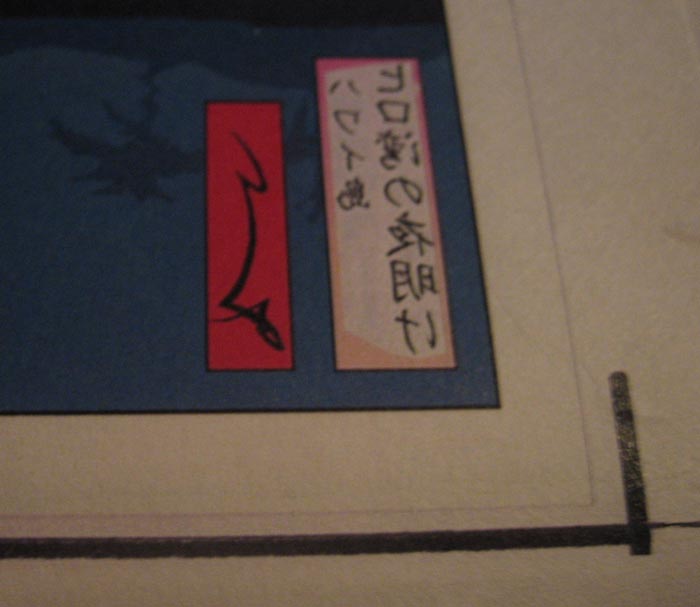
Here's a close-up of one - the corner registration mark will be on the block at the right front corner. The lettering here is reversed, not the usual method at all. (You can also see the results of our discussion on cartouche lettering last week. Before I placed his master on the copy machine, I glued a print-out of the new lettering design in place on it ...)
Now, if these colour separation sheets were of the traditional type, each one would now be 'coloured in' to show the exact area that is to be carved. But I'm not going to do that, for a couple of reasons. One is that, with no outlines in this print, these colour zones are going to have to be carved exactly along the divisions visible in the master, and I don't want anything interfering with the visibility. The other reason though, is that I am not going to be passing these things on to another carver for work - I'm going to do this carving myself. So what I will do is simply identify each one with some kind of number, and then as I work on each one, will refer back to the colour separation plans that we have already seen on these pages.
But before I can get started on that, these things have to go down onto the wood; time to head upstairs to my storeroom, and see if I can find six suitable pieces!

The thread continues in Hilo Bay [7] ...
Add Your Input