« Another Ukiyoe Heroes process video! | Front Page | Trouble Afoot ... more about colour separations »
Trouble Afoot ... colour separations
Posted by Dave Bull on November 23, 2013 [Permalink]
A ton of work done yesterday ... both the final decisions on the colour separations, then making the actual transfer sheets (the kyogo-zuri) and then getting them all pasted down onto bare wood!
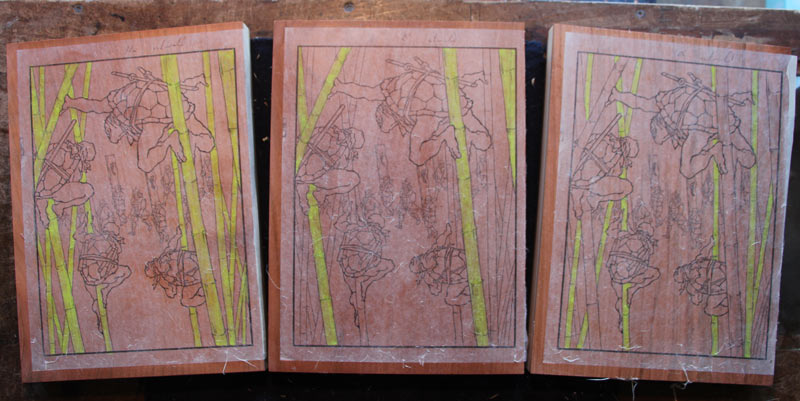
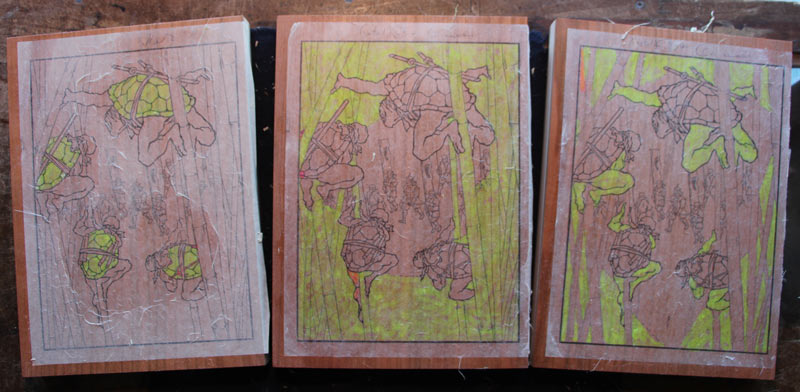
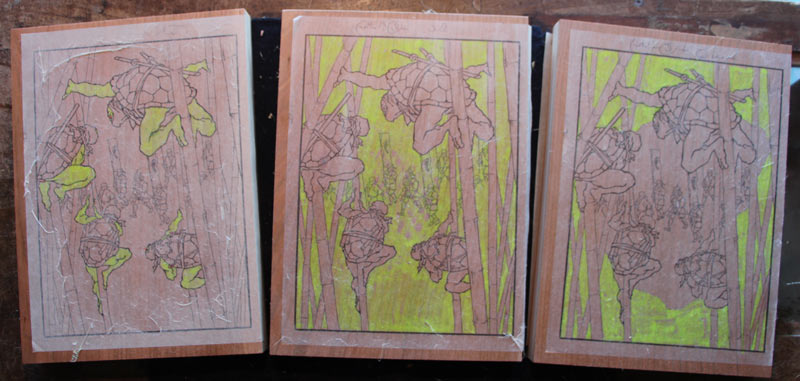
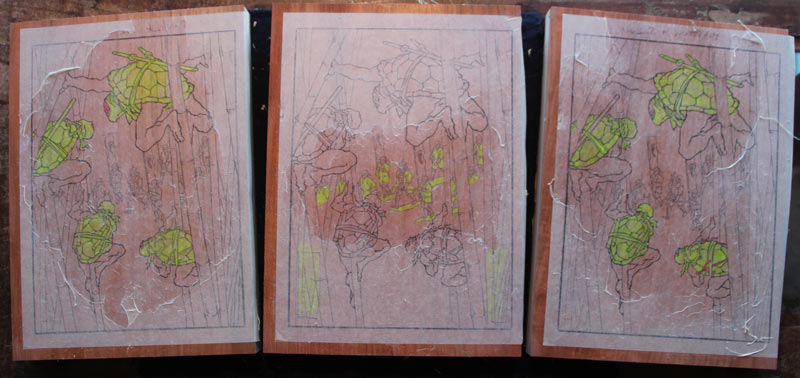
Here is the set of 12 kyogo-zuri, after they have all been 'coloured-in':


After checking and double checking - looking for forgotten places, or areas coloured in error, I spent most of Saturday morning matching them up with pieces of wood, and getting them pasted down. (Six blocks, using both sides):
It's certainly going to take a day or two to get this all carved, and while I'm doing that, I will of course be pondering the approach I will be taking to the proofing session - what sort of greens to mix, and how the layers might build up ... This one is going to be 'fun' to print ... in both senses of the term!
Added by: Marc Kahn on November 24, 2013, 3:36 am
Were the kyogo-zuri sheets prepared by taking 3 overlaid keyblock impressions, or did they come directly from photoshop through your laser printer?

Added by: Dave on November 24, 2013, 8:33 am
They were taken from the blocks themselves, absolutely! This might take a bit of explaining ...
Laser printers are totally unreliable, at least every one that I have checked so far, and that includes the half-dozen or so that we have had here over the years, as well all the ones at the Ueno branch of Kinko's (this is a few years back).
They handle the paper so roughly - passing it over multiple rollers, heating/cooling it, etc. etc. that you never get 'exactly' what Photoshop outputs. Notably, the images are almost always slightly distorted at the bottom of the page, due to the paper ever-so-slightly twisting as it goes through the internals of the machine.
You can easily test this yourself. Prepare a simple grid pattern, in Photoshop or Excel, etc., and print it out. Then check with something square, and you will see that what you have isn't actually square and straight. (I'm talking about nearly a millimiter off from bottom to top.)
So - knowing this from previous bitter experience - here's the procedure I have used for this design.
1) print out the initial design (which includes the border outlines) from Photoshop to my laser
2) take a knife to this, slicing it near the edges both vertically and horizontally, and lifting up the edge pieces and very slightly re-locating them so that the border box is 'square'.
3) paste it down, and cut it.
4) when preparing the transfer for the key block II, print it out from Photoshop, and lay it on top of a proof printed from key block I. I needed to slice it just once - vertically - and gently tease one section into perfect match.
5) paste it down, and cut it.
6) ditto for key block III, using a guide version printed from the actual blocks for I and II.
7) So the three keys are now logically consistent with each other, but may now slightly differ from the original Photoshop master. My initial adjustment of the first transfer sheet may have brought my stuff into line with the original, or maybe not. I have no way to tell.
8) Now, for all the subsequent colour blocks (exceptions noted below) the process is simple. Ignore Photoshop, and simply work in the traditional way, making the colour transfers from the key block(s). This is what you see above. Guaranteed to all line up properly.
9) But.
10) There is still a fair amount of detail which I need from Jed's original: the location of the mottled pattern on the ground in the center of the image, all the bamboo leaves, the pattern on the turtle shells, and the patterning he drew on their skin. I could draw this by hand, referring to his design, but I'd rather use his lines directly, of course. We need Photoshop again.
11) So what I did with - for example - the bamboo leaf blocks, is to lay them out with wider areas of wood covering the required area. You can see this in the top three sheets in the very first image up at the top of this page. These are the blocks for three layers of bamboo leaves. After I have carved them as you see, I will then return to Photoshop and print out the leaf patterns on the usual thin gampi paper. I will take an impression from each 'overly' carved block, lay the pattern in place - perhaps having to slice and re-position slightly - then paste down and cut.
12) Repeat for each of the blocks that contains such patterning.
It sounds overly complicated, but it's not so bad actually. Simply at each stage I have to ensure that the block set itself is internally consistent.
If laser printers were 'perfect' none of this would be necessary. I could simply have printed out the 12 sheets using the Photoshop data, then pasted and cut them as is.
How does this all differ from the 'old days' when there was no Photoshop? They would have done it like this:
1) get design from artist
2) draw out manually the lines for the initial block
3) paste down and cut
4) take impressions from it
5) draw on these by hand, all the data for all subsequent blocks, referring to whatever information the artist may have provided (sample leaf patterns, etc. etc)
Remember, they weren't working from a 'completed' version, as I am, but from an initial sketch. The detail for their prints was created as the process went along. The publisher had people working for him who could draw whatever was necessary (all the kimono patterns, dots and lines for textures, leaves, etc and etc.) They made it up as they went along ...
If Jed lived near here, we could perhaps do it that way too. Instead of me going through all these hoops to get those leaves in the correct place, I could simply pass Jed the set of kyogo-zuri, and ask him to draw leaves in the correct places. Not sure if he could actually do that, as he is also used to working on the thing in digital form, moving leaf groups around to try various positions, etc. etc.
Anyway, this has been a long answer to a simple question ... sorry!
Added by: Marc Kahn on November 24, 2013, 9:18 am
Thanks for taking the time to explain! Now, I understand how you made the 3 internally consistent keyblocks.
Add Your Input